


New Shu Uemura Eye Products (and a Winged Teal Liner Tutorial)
There are some new Shu Uemura eye products out this month;
- Tsuya Skin Youth Infusing Eye Concentrate
- The s curler
- Tokyo Lash Mascara
and I’m giving them a more in-depth and hands-on test-run! Will walk you through the simple tutorial for this look while talking you through each of the items in turn!
-
1. Prepping the skin…
Tsuya Skin Youth Infusing Eye Concentrate:
This new fluffy eye cream is designed to work under eye makeup like a primer, so you don’t need to worry about it flaking and “pilling” when you apply things over it, or making your shadows streaky and patchy. The best thing is - it works like a primer under the eyes as well, so your concealer goes on smoother and lasts longer. Perfect for lazy girls who don’t like applying a separate eye cream and eyeshadow primer.
I’ll have to test longer to let you know if it has a noticeable tightening and lash-lifting effect
-
2. Undereye concealer…
I applied Shu Uemura’s Point Cealer, which is a matte-finish blemish concealer. This is a long-lasting cream-to-powder concealer that I wouldn’t normally apply under the eyes because my skin is so dry there anything matte usually refuses to blend or sit well. But Tsuya Eye Concentrate did manage to keep everything smooth and stop the concealer from settling into fine lines.

(7YR Medium is slightly too dark for my NC25 skin and I had to mix in a dot of paler concealer to lighten it up, so take note if you are referencing my skin color.)
-
3. Because this look is all about the liner, I did not apply any shadow. To keep the lids looking fresh, apply a light sweep of translucent powder over it.

-
4. Begin your liner application. I’m using a beautiful teal from Laura Mercier called Canard and a Maybelline gel liner brush. You can use ANY color you own or like although I’d recommend a matte shade for this look.

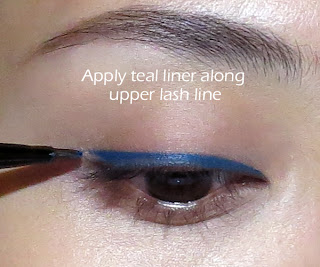


If there is any gap or unevenness between the 3 lines, just fill it in.
-
5. Curl your lashes well! This dramatic liner look can really obscure the lashes, so you want them pointing really high so they’re still visible.
The “s curler” is the new addition to the Shu family.
While partial curlers are slower to use than regular ones (you have to curl your lashes in sections from outside in), they allow perfectionists to get at those inner and outer corners the way most regular curlers can’t.
For false-lash wearers, the s curler is also designed with no side-bars, so you can press your natural and false lashes together without gripping and pulling them off like some curlers will.
But after using it a few times, I would say the people who would get the biggest benefit from this are newbies and people with mono-lids and hooded lids. The specially-constructed lid pad and angled curling blade designed by the Shu Uemura team actually helps to lift and push back your lid so you reach your lashes easily without clipping your skin. Perfect if your lid tends to fold down and get in the way of your lashes!

Tip: Always curl at least twice along your lashes; once at the roots, and once in the center of the length, so you get a nice upward curve (“C shape) and not a weird bend (“V” shape).
-
6. Apply mascara!
Tokyo Lash Mascara is a super-black, “lacquer-effect”, lengthening one-coat mascara for people who don’t want to spend a whole lot of time building and building their lashes. It’s also smudge-proof and contains a special ceramide to condition and strengthen lashes against breakage.
The criss-cross “kirenaga” brush is designed to quickly grab and coat even short hairs (great for lower lashes).
Shu Uemura actually doesn’t recommend layering Tokyo Lash mascara, and I find if you try to do that, it can give you stumpy tips because the formula thickens and sets quickly.

Tip: If you love applying a few coats of mascara and worry that a single-coat product won’t give you the same volme and length, try this. First do zig zags at the base of your lashes to get some volume around the lower portions. Then wielded the wand diagonally, and applied mascara in an upwards stroking motion along the lash lengths for separation and length.

The finished eye look!
7. [Optional] As a finishing touch, I sprayed the sides of my face with MAC Fix+ (you can use any alcohol-free toner) and patted on transparent blue-green glitter on the cheekbones and brow bones, where you would normally apply highlighter. This is a fun twist on highlighting, and complements the look without detracting from the strong, graphic eye.

Other Products Shown
Cheeks: Peri Pera blush #3, a pastel poppy pink
Nail Color: Etude House PPP503, pastel blue creme with gold and blue multi-glitter
Lip suggestion: a soft beige-pink would work great with this look.